Securing the right visa is an essential step for anyone planning to enter, work, or live in the Philippines. With updated application systems, digital tools, and strict documentation standards, every traveler and expat must approach the Philippine visa process strategically.
Understanding Visa Types: Which Philippine Visa Do You Need?
Before diving into the application process, it’s vital to identify which visa fits your situation:
- Tourist Visa (9A): For short-term visits, sightseeing, family, or business meetings.
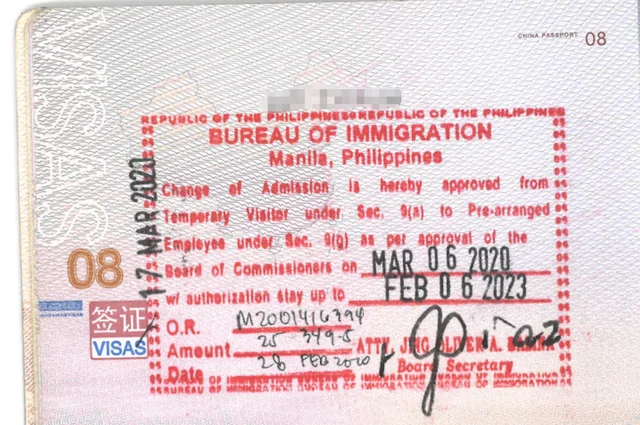
- Work Visa (9G): Required for any foreign national engaging in paid employment, along with an Alien Employment Permit (AEP).
- Student Visa (9F) or Special Study Permit: For international students accepted by Philippine academic institutions.
- Retirement (SRRV), Marriage (13A), Investor (SIRV), and PEZA/BOI Special Visas: Each tailored to expats, spouses, or investors with specific criteria.
- Special Work Permit (SWP) and Provisional Work Permit (PWP): For project-based or short-term employment.
Selecting the right category is critical since requirements and allowed activities vary for each visa.
Step-by-Step: How to Process Philippine Visas in 2025
- Confirm Your Eligibility and Visa Type
Identify your purpose: tourism, business, study, work, or family. Check the latest rules, as visa policies are revised regularly. Ensure your travel dates, professional engagements, or investments align with the visa’s permitted activities. Nationals of countries on the Executive Order 408 list can enjoy 30 days of visa-free tourism and short visits—longer stays or non-tourist purposes require a formal visa application.
- Prepare Your Documentary Requirements
Every Philippine visa has standard and type-specific requirements. Common documents include:
- Passport (valid for at least six months beyond intended stay)
- Duly accomplished visa application form (downloadable from embassy or consular sites)
- Passport-sized photos per BI standards
- Proof of sufficient financial means (bank statements, payslips, or sponsor guarantee letters)
- Travel itinerary (flight bookings, hotel reservations, or invitation letters)
- For work/student/investor visas: additional permits, contracts, acceptance or enrolment certificates, business/investment evidence
- Police clearance, medical examination, or other consular-specific forms
Pro tip: Passports and supporting documents issued abroad must be apostilled or legalized if requested.
- Application Submission: Where and How to File
For Short-Term Visas (Tourist, Business):
- Overseas Application: Submit to the nearest Philippine Embassy/Consulate.
- E-visa/eTravel System: Some nationalities can apply online at [evisa.gov.ph] or register travel via [etravel.gov.ph].
- Direct In-Country Extensions: Visa-free travelers seeking to extend past the 30-day allowance must apply at a Bureau of Immigration office before expiry.
For Long-Term, Work, or Special Visas:
- Typically filed in person at the Bureau of Immigration (BI) or the relevant agency in the Philippines.
- Employers and schools assist in securing supporting documentation (like Alien Employment Permits or acceptance letters).
Embassy appointments must be booked in advance—slots may be limited due to high volume. Never finalize travel bookings before visa approval to avoid loss from potential denials or delays.
- Undergo Pre-Assessment and Document Review
Embassies and consulates often require a pre-assessment: you email or upload completed forms and scanned documents for initial review. The visa officer requests hard copies only if preliminarily approved. Always double-check that all details (names, dates, and numbers) match those on your official documents to avoid delays.
- Pay Prescribed Visa Fees
Fees range by visa type, processing speed, and applicant nationality. Payment methods and deadlines are specified by the embassy or BI; be sure to use only the recommended channels. No refund will be issued for denied visas, so ensure documents are in order before remitting payment.
- Attend Interviews or Provide Biometrics (if Required)
Some applications require in-person interviews, biometric data capture (photo, fingerprints), and additional supporting evidence. Be prepared to answer questions regarding your stay, finances, or supporting institution/employer.
- Track Processing Timeline and Await Decision
The standard processing time for most Philippine visa applications is 5-10 business days from receipt of complete hard copies, but can be longer for complex or high-volume cases, or those requiring clearance from DFA Manila. Always start applications at least a month in advance.
- Collect Passport and Visa or Receive Digital Approval
Passports are released by mail/return envelope, or in person at the embassy upon approval. E-visas and eTravel QR codes are delivered via email; secure both digital and printed copies for travel.
Completing Your eTravel Registration: Mandatory for All
All travelers (including Filipinos) must register at [etravel.gov.ph] within 72 hours of arrival or departure. This online health and migration system is free and generates a QR code for immigration clearance. Young children under 12 can be listed as dependents on their parents’ form; older travelers must register separately. Errors can only be fixed by re-registering within the allowed window.
Common Mistakes in Philippine Visa Applications—And How to Avoid Them
- Submitting outdated or incomplete documents (e.g., expired bank/medical certificates, missing forms)
- Failing to check the latest embassy or BI requirements (policies change regularly)
- Inconsistent information across forms (mismatched names, incorrect dates)
- Not showing sufficient financial proof or a clear travel itinerary
- Waiting until the last minute—rushed submissions risk costly errors
- Using the wrong payment method or missing fee deadlines
- Not registering for eTravel within the required timeframe
Proactive preparation and careful attention to embassy instructions are key to avoiding these pitfalls.
Important Reminders: Processing Tips and Legal Compliance
- Apply as early as possible; visa and permit backlogs are common.
- Never falsify or “pad” information; inaccuracies can lead to blacklisting.
- For work and student visas, let sponsoring companies or schools check and prepare the requirements.
- Always keep digital and paper copies of submitted forms and receipts.
- For visa extensions, start the process 2-3 weeks before your stay ends.
- Upon arrival in the Philippines, comply with the health, Immigration, and Customs rules.
Key Takeaways
Processing a Philippine visa doesn’t have to be intimidating, provided you follow the step-by-step process, prepare all documents, register your travel on time, and avoid common errors. Whether you’re a tourist, businessperson, worker, or new resident, understanding current rules will lead to a smoother, hassle-free travel and settlement experience.
Need Help Processing Your Philippine Visa Application?
Work Visa Philippines offers full-service support, guiding applicants from document preparation and eTravel registration to submission and compliance checks. For business, employment, study, or long-term residency, our experienced team helps you avoid delays and costly mistakes:
- Contact Us Here
- Fill Out the Form Below
- Call us at +63 (02) 8540-9623